Resource configuration
Back to home
On this page
When you first deploy your project, or add a new app or service to it, Upsun allocates default resources to each of your containers. If you don’t want to use those default resources, define a different resource initialization strategy.
After the initial deployment, or if you opt for the Manual resource initialization strategy,
you can adjust container resources manually.
To do so, follow the instructions on this page.
Upsun allows you to configure resources (CPU, RAM, and disk) per environment for each app and service. You can also add instances for each app depending on your needs.
For example, you can scale vertically and allocate more resources to your production and staging environments than to your development environments. This flexibility allows you to optimize performance and costs.
You can also scale horizontally if your apps are struggling with high load, or if you’re expecting a traffic spike, by adding more instances for your apps and workers.
Note
For information on costs related to resource usage, see the Upsun pricing page. You can monitor these costs in the Console.
Vertical scaling 
To define how much CPU, RAM, and disk storage you want to allocate to each individual container, follow these steps:
To set resources for each of your apps and services, you can use the Upsun CLI interactive prompts, or run commands manually.
- Interactive prompts:
Run the upsun resources:set command, and follow the prompts to set resources for each app and service.
Note
For further guidance on how to set resources using the CLI, run the upsun resources:set --help command.
Note that if the deployment fails after you’ve run upsun resources:set,
you may need to set the resources again.
After you’ve set resources, your environment is redeployed, which causes a short downtime.
- Manual commands:
Run the resources:set command using the following CLI options:
| CLI option | Description |
|---|---|
size |
Allows you to define how much CPU you want to allocate to each app or service.The amount of CPU then determines how much RAM is also allocated, based on the container profile. |
disk |
Allows you to define how much disk/storage you want to allocate to each app or service. |
Example 1:
The following command allocates 0.1 CPU to the frontend app, 0.25 CPU to the backend app, and 1 CPU to the database service.
The amount of RAM these settings translate into depends on each container profile.
upsun resources:set --size frontend:0.1,backend:0.25,database:1Example 2:
The following command allocates 640 MB of disk to the backend app, and 2048 MB to the database service:
upsun resources:set --disk backend:640,database:2048Example 3:
You can also use wildcards. For example, if you have two apps named frontend and backend,
you could allocate the same CPU and RAM combination to both by using the following command:
upsun resources:set --size '*end:0.1'- Open your project.
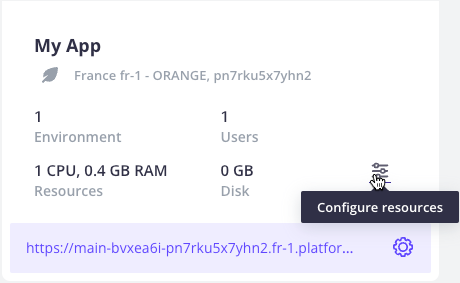
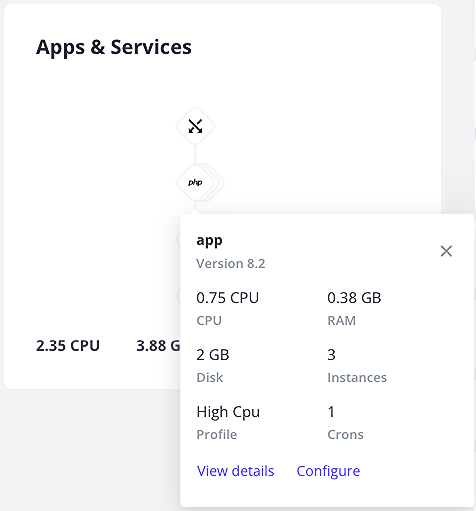
- Click the Configure resources button in the project card or the App & Services panel:

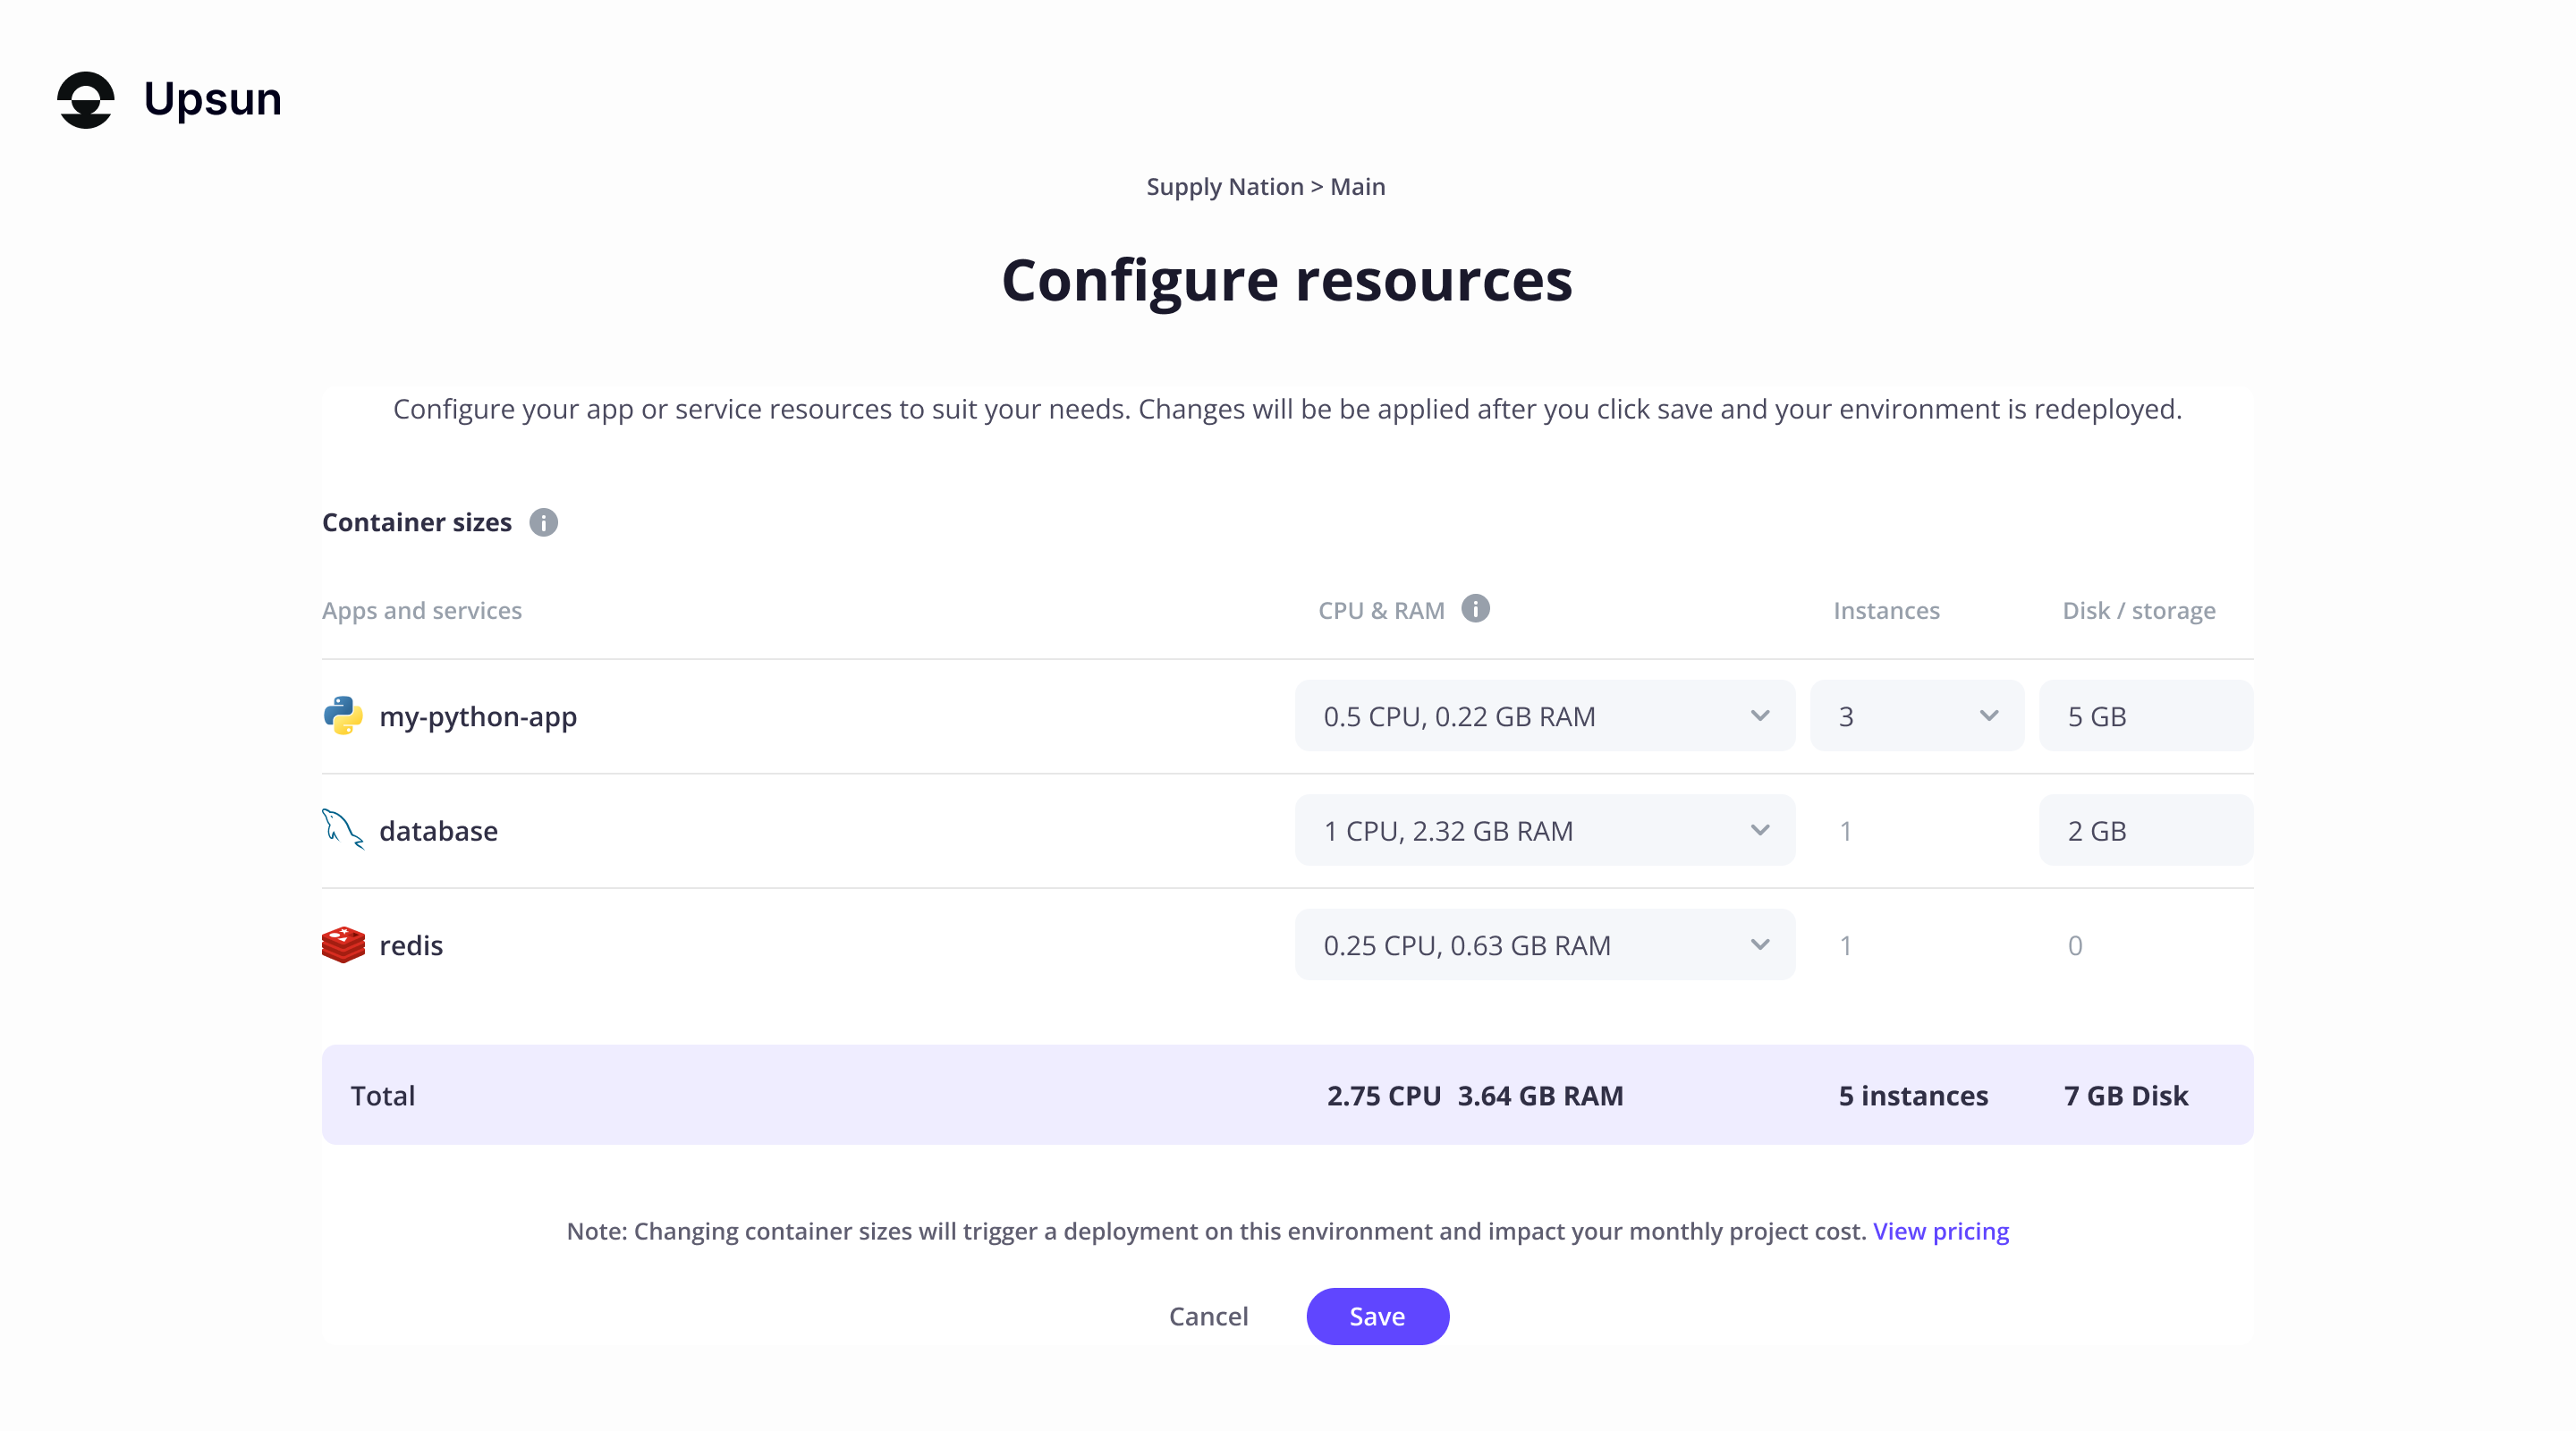
- For each app and service, select a CPU & RAM combination, and enter the amount of disk/storage you want to allocate.

Note
The values from the CPU & RAM menu depend on the container profile of each instance. If you deploy several instances of your app, the selected CPU & RAM combination isn’t divided between those instances. Each instance benefits from the full, selected CPU & RAM.
- Click Save. You environment is redeployed, which causes a short downtime.
Horizontal scaling 
For apps and workers, you can also define how many instances you want to deploy. To do so, follow these steps:
Note
When you have several instances of an app, the Upsun router randomly distributes requests to available instances.
To define how many instances of an app or worker you want to deploy, you can use the Upsun CLI interactive prompts, or run commands manually.
-
Interactive prompts:
Run the
upsun resources:setcommand, and follow the prompts to set resources for each app and service.
Note
For further guidance on how to set resources using the CLI, run the upsun resources:set --help command.
Note that if the deployment fails after you’ve run upsun resources:set,
you may need to set the resources again.
-
Manual commands:
To scale an app or worker, run the following command:
Terminalupsun resources:set --count APP_NAME:NUMBER_OF_INSTANCESFor example, to scale your
myappapp to 3 instances, run the following command:Terminalupsun resources:set --count myapp:3You can also set the same instance count for all your apps using a wildcard. To do so, run the following command:
Terminalupsun resources:set --count '*:NUMBER_OF_INSTANCES'For example, to scale all your apps to 3 instances, run the following command:
Terminalupsun resources:set --count '*:3'
Note
For further guidance on how to set resources using the CLI, run the upsun resources:set --help command.
After you’ve set the number of instances for your apps and workers, your environment is redeployed. If you’ve made no other changes, this redeployment causes no downtime.
If the redeployment fails after you’ve run upsun resources:set,
you may need to set the resources again.
- Open your project.
- Click the Configure resources button in the project card or the App & Services panel:

- For each of your apps and workers, select the number of instances you want to deploy.

Note
If you deploy several instances of your app, the selected CPU & RAM combination isn’t divided between those instances. Each instance benefits from the full, selected CPU & RAM.
- Click Save. Your environment is redeployed. If you’ve only made changes to the number of instances for your apps and workers, this redeployment causes no downtime.
Autoscaling
Upsun provides native autoscaling support. You can configure thresholds for metrics such as CPU, RAM, and request latency. Resources will automatically adjust horizontally to meet demand.
View application instance details 
Upsun maintains a real-time indexed list of an application’s instances and their IP addresses in the project’s /run/peers.json file. You might view this read-only file to gain insight into how your application instances are distributed. Upsun maintains this file whether you scale instances manually or have autoscaling enabled.
Distributed applications (for example, those running on Elixir and Erlang) and applications that can scale horizontally must be aware of all its instances in order to coordinate activities such as setting up clusters and handling application failures.
The number of instances in this file at any time matches the number of application instances shown on the Configure Resources page of the Console.
To view the contents of the file, run this command from the root of your project directory:
cat /run/peers.json | jqThe output is similar to this:
{
  "hello_distributed.1": "123.456.789.10",
  "hello_distributed.3": "123.456.789.20",
  "hello_distributed.2": "123.456.789.30",
  "hello_distributed.0": "123.456.789.40"
}
Advanced: Container profiles 
Shared CPU container sizes 
By default, Upsun allocates a container profile to each app and service depending on the range of resources it’s expected to need.
Each container profile gives you access to a specific list of CPU and RAM combinations. Using the Upsun CLI or Console, you can then pick a CPU and RAM combination for each of your apps and services.
There are four container profiles available: HIGH_CPU, BALANCED, HIGH_MEMORY, and HIGHER_MEMORY.
The following table displays the different CPU and RAM combinations each container profile provides:
| CPU | HIGH_CPU |
BALANCED |
HIGH_MEMORY |
HIGHER_MEMORY |
|---|---|---|---|---|
| 0.1 | 64 MB | 352 MB | 448 MB | 864 MB |
| 0.25 | 128 MB | 640 MB | 832 MB | 1472 MB |
| 0.5 | 224 MB | 1088 MB | 1408 MB | 2368 MB |
| 1 | 384 MB | 1920 MB | 2432 MB | 3840 MB |
| 2 | 704 MB | 2800 MB | 4032 MB | 6336 MB |
| 4 | 1216 MB | 4800 MB | 6720 MB | 10496 MB |
| 6 | 1728 MB | 6080 MB | 9024 MB | 14080 MB |
| 8 | 2240 MB | 7296 MB | 11200 MB | 17408 MB |
You can check which container profile is set for an app or service in your project from the Console. To do so, navigate to your environment and select the app or service in the tree on the left-hand side:

For information on resource-related costs, see the Upsun pricing page.
Guaranteed CPU container sizes 
When selecting a container profile for Guaranteed CPU, use the table below to identify available CPU and memory combinations. These predefined sizes help you match resource profiles to your application’s workload requirements.
| CPU | HIGH_CPU | BALANCED | HIGH_MEMORY | HIGHER_MEMORY |
|---|---|---|---|---|
| 4 | 8 GB | 16 GB | 32 GB | not supported |
| 8 | 16 GB | 32 GB | 64 GB | not supported |
| 16 | 32 GB | 64 GB | 128 GB | not supported |
| 32 | 64 GB | 128 GB | 256 GB | not supported |
| 48 | 96 GB | 192 GB | 384 GB | not supported |
| 64 | 128 GB | 256 GB | 512 GB | not supported |
Note
Guaranteed CPU is not currently available on OVHcloud regions and some CPU sizes may not be available in all regions.
For more information about the available configurations and sizes, visit the Upsun pricing calculator.
Default container profiles 
The following table shows the default container profiles Upsun applies when first deploying your project.
| Container | Default profile |
|---|---|
| Chrome Headless | HIGH_CPU |
| ClickHouse | HIGH_MEMORY |
| .NET | HIGH_CPU |
| Elasticsearch | HIGH_MEMORY |
| Elasticsearch Premium | HIGH_MEMORY |
| Elixir | HIGH_CPU |
| Go | HIGH_CPU |
| Gotenberg | HIGH_MEMORY |
| InfluxDB | HIGH_MEMORY |
| Java | HIGH_MEMORY |
| Kafka | HIGH_MEMORY |
| MariaDB | HIGH_MEMORY |
| Memcached | BALANCED |
| MongoDB | HIGH_MEMORY |
| MongoDB Premium | HIGH_MEMORY |
| Network Storage | HIGH_MEMORY |
| NodeJS | HIGH_CPU |
| OpenSearch | HIGH_MEMORY |
| Oracle Java | HIGH_MEMORY |
| Oracle MySQL | HIGH_MEMORY |
| PHP | HIGH_CPU |
| PostgreSQL | HIGH_MEMORY |
| Python | HIGH_CPU |
| RabbitMQ | HIGH_MEMORY |
| Redis ephemeral | BALANCED |
| Redis persistent | BALANCED |
| Ruby | HIGH_CPU |
| Rust | HIGH_CPU |
| Solr | HIGH_MEMORY |
| Varnish | HIGH_MEMORY |
| Vault KMS | HIGH_MEMORY |
Adjust a container profile 
In most cases, it’s best not to adjust container profiles. As a best practice, Upsun recommends adjusting the profile of a container only if the CPU/RAM ratio doesn’t match how the container scales, taking into account both production and preview (staging and development) environments.
To adjust a container profile, amend the value of the container_profile key in your configuration:
applications:
  APP_NAME:
    container_profile: HIGH_MEMORY

services:
  SERVICE_NAME:
    type: SERVICE_TYPE:VERSION
    container_profile: HIGHER_MEMORY